

Sunday, June 24, 2012

Wednesday, June 13, 2012
Back in the Saddle?
Let's see... it's been over a year since I last posted. Lots happened: I moved (ugh), got married (yay!) and did loooooots of projects along the way. That is to say, I have lots of fodder to get the ol' blog going again.
For now, here's a pic of a creamer cow living out an alternate life as a bud vase:


For now, here's a pic of a creamer cow living out an alternate life as a bud vase:

And Marble using a ridiculously stupid pillow cat toy as an actual cat pillow:

Tuesday, May 10, 2011
Round Here
Here's what's currently going on around here:


Broken toes

Painting chairs

Puzzling
That's all she wrote.
Sunday, May 8, 2011
Side Table
Most of my furniture is stuff I've picked up secondhand, and my living room side table is no exception. I got it for $30 at the local junior guild resale store, which has some really good stuff. They had a beautiful mission side table that I was coveting, but at $70 I had to pass.
But I love this table. It is some heavy-duty wood and I actually like the color a lot. The original pulls were these strangely shaped loops, so I replaced them with a couple of knobs from Anthropologie. But that's all I had to do to make this one presentable... not too shabby.

But I love this table. It is some heavy-duty wood and I actually like the color a lot. The original pulls were these strangely shaped loops, so I replaced them with a couple of knobs from Anthropologie. But that's all I had to do to make this one presentable... not too shabby.

Wednesday, March 30, 2011
Ugliness ---> Awesomeness
Remember that basket that is hanging out in my TV stand?

Well, it is kind of ugly. Whatever wicker material it's made out of is unfinished (read: dull) and a light, nondescript, blah color. I got tired of the ugliness and decided to do something about it.
I actually got two of these baskets thinking they would both go under the TV, but the DVD player and VCR made it impossible to use another basket opposite the one in the picture above. The other basket found a home on the bottom shelf of my bookshelf and now holds oversize books and Scout's growing collection of cat toys. I used that one as my guinea pig basket.
Here are my supplies for the ugly basket renovation project:

Basically the idea was to stain the wicker using plain old wood stain. Everything else is for protection of the work area besides the chip brush and t-shirt, which are used to apply the stain. Wood stain is so easy to use and really makes a remarkable difference in most cases (see this post for example). The key is just to have an unfinished surface to work with. If my baskets hadn't been inexpensive unfinished wicker, the stain would not have had much effect. As it is, though, here's the photographic proof of the Power of the Stain:


Well, it is kind of ugly. Whatever wicker material it's made out of is unfinished (read: dull) and a light, nondescript, blah color. I got tired of the ugliness and decided to do something about it.
I actually got two of these baskets thinking they would both go under the TV, but the DVD player and VCR made it impossible to use another basket opposite the one in the picture above. The other basket found a home on the bottom shelf of my bookshelf and now holds oversize books and Scout's growing collection of cat toys. I used that one as my guinea pig basket.
Here are my supplies for the ugly basket renovation project:

Counterclockwise from left: gloves, wood stain, piece of old t-shirt, plastic drop cloth, chip brush, newspaper. Also, ugly basket (not pictured).
Basically the idea was to stain the wicker using plain old wood stain. Everything else is for protection of the work area besides the chip brush and t-shirt, which are used to apply the stain. Wood stain is so easy to use and really makes a remarkable difference in most cases (see this post for example). The key is just to have an unfinished surface to work with. If my baskets hadn't been inexpensive unfinished wicker, the stain would not have had much effect. As it is, though, here's the photographic proof of the Power of the Stain:

Before.

During (1st coat).

After 2 coats (finished basket on the left; yet-to-be-done basket on the right)
How 'bout DEM apples.
Friday, March 25, 2011
In which I get lucky twice
This is my TV stand. I got it at Goodwill for $50. I was actually a little disappointed I had to pay $50 for it, but it's solid wood and there was no way I was going to buy something new that was laminate and cost twice as much. Plus I was really desperate at the time, since my living room looked like this:

Watching TV while it was on the floor was not so fun. I was worried when I was looking that I wouldn't be able to fit a stand in the skinny/smallish space in that corner.

I stood in the Goodwill looking at the stand for a good 15 minutes arguing with myself about whether it would fit. Eventually I bit the bullet and took it home, and phew did I get lucky. It fit both the space and the TV perfectly, and it wasn't that ugly. If I had my way I would strip and restain it, but that's a bigger project for another day. The more immediate facelifts: 1) finding that basket that's in the top picture to hold movies and 2) replacing the drawer knob with something with a little more pizazz soon. I found the basket for like $12 at HomeGoods, and that thing slid into the space like it was made for it (lucky break #2). I also have plans to spruce it up as well. All in good time.
Thursday, February 17, 2011

Tuesday, February 15, 2011
Family Tree
This is a project that my sister and I did over the summer, and unfortunately I don't have any pictures of the finished product because, well, oversight.
The project was creating a family tree, and not just one of those where you have paper and a tree and you fill in names. We wanted it to look fancy and be wall-hangable. My mom & sister had spent a lot of time researching and figuring out the family history, all the way back to Constable Andrew Everest, who came to Maine from England in the 1640s. So for my mom's birthday (in June), we decided to make the family tree.
We went through a lot of thought about what kind of materials to use that wouldn't make it look like some homegrown craft project. We eventually settled on using a foamboard as the base, covering it with some brown fabric, and printing out each individual's name on thick brown scrapbook paper and mounting that on one of 3 different types of scrapbook paper, depending on what generation the individual belonged to. The lines connecting the names would be made out of round silver cord for the horizontal lines and smaller silver cord for the vertical ones. Here's what it ended up looking like:


The project was creating a family tree, and not just one of those where you have paper and a tree and you fill in names. We wanted it to look fancy and be wall-hangable. My mom & sister had spent a lot of time researching and figuring out the family history, all the way back to Constable Andrew Everest, who came to Maine from England in the 1640s. So for my mom's birthday (in June), we decided to make the family tree.
We went through a lot of thought about what kind of materials to use that wouldn't make it look like some homegrown craft project. We eventually settled on using a foamboard as the base, covering it with some brown fabric, and printing out each individual's name on thick brown scrapbook paper and mounting that on one of 3 different types of scrapbook paper, depending on what generation the individual belonged to. The lines connecting the names would be made out of round silver cord for the horizontal lines and smaller silver cord for the vertical ones. Here's what it ended up looking like:

The names set out (and hot glued on) before the lines connecting the various family relationships were added. The 3 different types of scrapbook paper depicting the different generations can be seen here (matte brown paper, brown paper with raised decoration, and red paper with velvet).

In the midst of adding the silver cord. The thicker cord stretched across each generation of kids, and the thinner cord connected the parent pair and each kid to the thick cord.

This is the last picture I took of the project still in progress. I promise it did get finished... I guess I'll have to take a picture the next time I go to Dallas. I have to say that it turned out WAY better than I was anticipating. It actually didn't look like some craft project, and will look pretty snazzy when it eventually gets framed. Plus my mom loved it :)
Sunday, February 13, 2011
T-1
this one's a two-fer (back and front)


magazine cutouts + construction paper + mod podge
1 day until Valentine's Day


magazine cutouts + construction paper + mod podge
1 day until Valentine's Day
Saturday, February 12, 2011

Friday, February 11, 2011

Thursday, February 10, 2011

Wednesday, February 9, 2011
T-5

heart sticker + construction paper + scrapbook paper + sewn by machine

magazine cutout + construction paper + scrapbook paper
5 days until Valentine's Day
Tuesday, February 8, 2011
T-6

Magazine cutout + scrapbook paper cutout + construction paper

Magazine cutouts + heart stickers + silver Sharpie + construction paper
6 days until Valentine's Day
Get Ready...
For the annual
Valentine's Day Countdown!
It's that time again... the time of cooing doves and swooning women. Also, the time when I make a bunch of Valentine's Day cards and use them as excuses to make daily blog posts. Without further ado...


Valentine's Day Countdown!
It's that time again... the time of cooing doves and swooning women. Also, the time when I make a bunch of Valentine's Day cards and use them as excuses to make daily blog posts. Without further ado...

Magazine cutouts + scrapbook paper + silver Sharpie pen + construction paper

Magazine cutouts + construction paper + stitched by machine
7 days until Valentine's Day
Sunday, February 6, 2011
The Kitchen Corner
My kitchen is pretty tiny, but even small spaces need sprucing. This is what it looked like when I moved in:


From the placement of the rug, you can tell just how skinny the space is. Now I know what you're saying.. "What up with the lack of upper cabinet doors? And what's with the odd waste of space 1) for the stupid decorative shelf in the middle of the cabinets and 2) beside the stove?" Well, I can't say I understand the kitchen design choices.. but I am forced to work with them. Such is the curse of the renter. My food just stays on display all the time.
The strange empty corner by the stove is no longer empty, though. Here's what it looks like now:

Woo happy corner! Bogart and Bergman had been holding down the fort by themselves for a while, but now they've been joined by some other wall decor (two aprons and photos of Central Park) and a little table that fills up the corner space. Here's a closer look at the table:


From the placement of the rug, you can tell just how skinny the space is. Now I know what you're saying.. "What up with the lack of upper cabinet doors? And what's with the odd waste of space 1) for the stupid decorative shelf in the middle of the cabinets and 2) beside the stove?" Well, I can't say I understand the kitchen design choices.. but I am forced to work with them. Such is the curse of the renter. My food just stays on display all the time.
The strange empty corner by the stove is no longer empty, though. Here's what it looks like now:
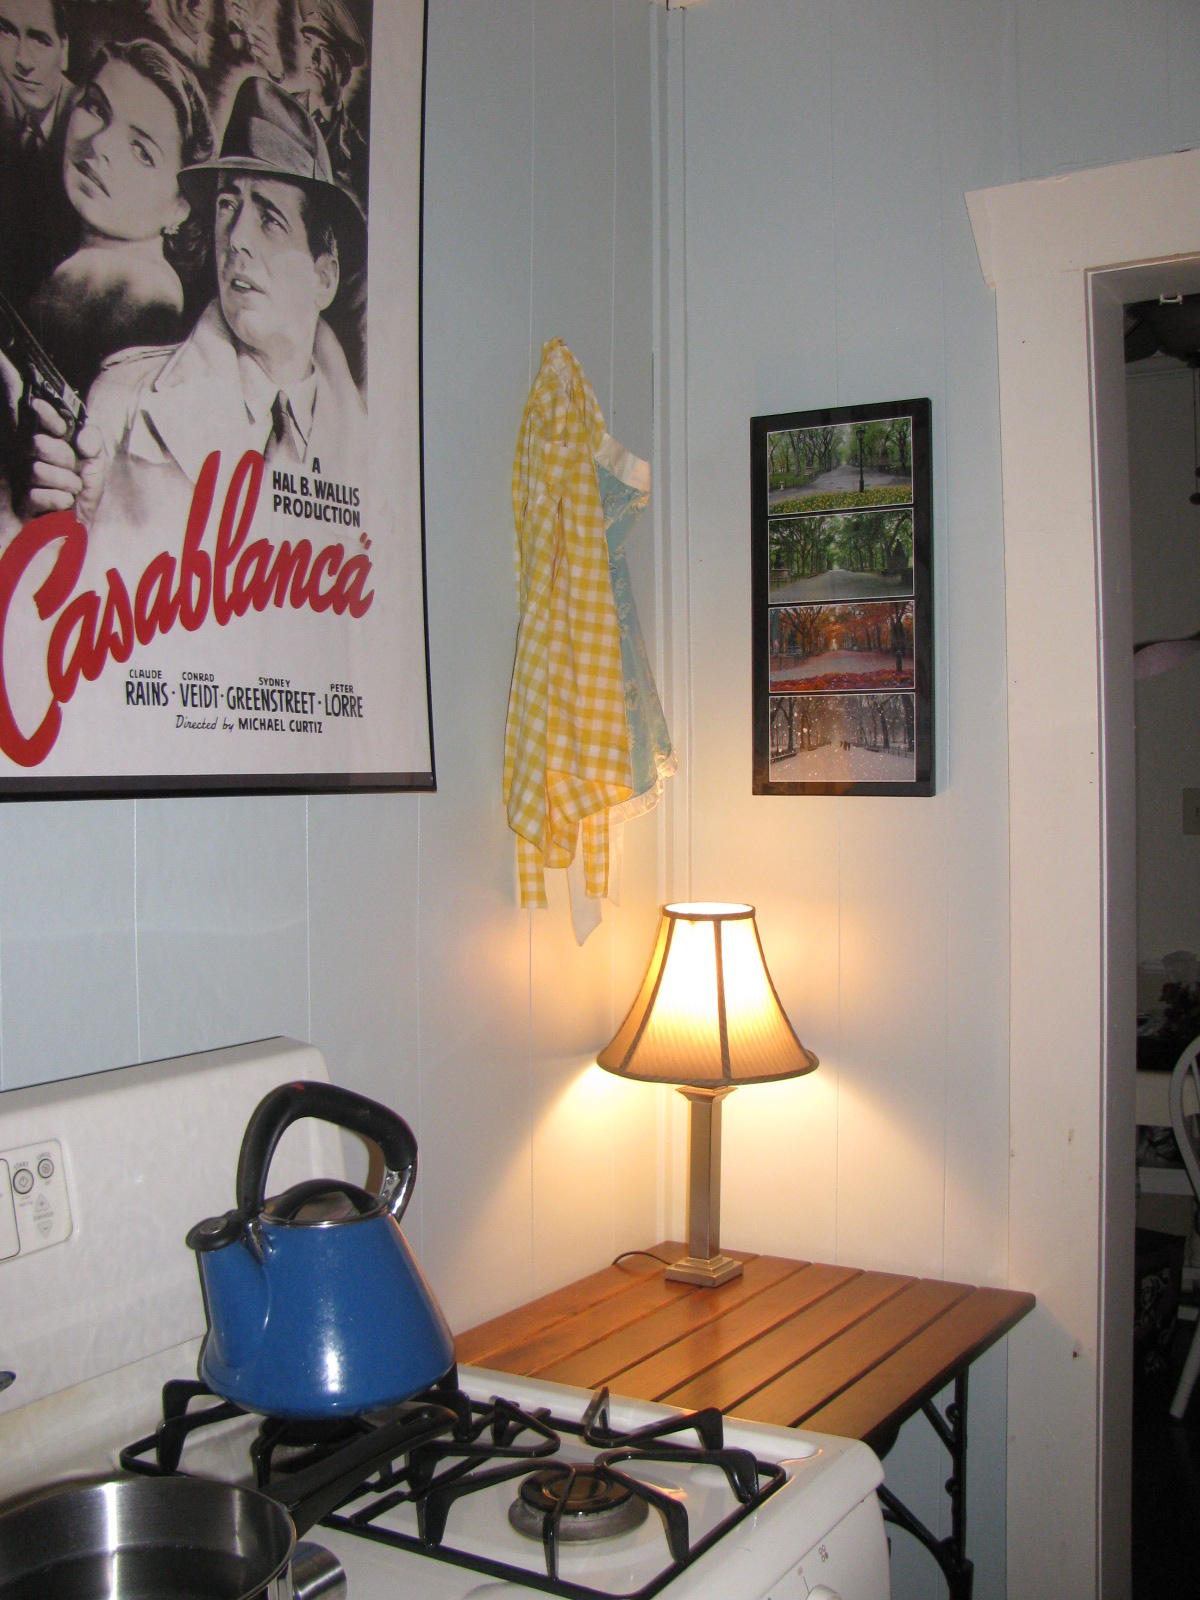
Woo happy corner! Bogart and Bergman had been holding down the fort by themselves for a while, but now they've been joined by some other wall decor (two aprons and photos of Central Park) and a little table that fills up the corner space. Here's a closer look at the table:


My mom found this table at Canton Trade Days (a HUGE flea market type event) and gave it to me for Christmas. The bottom is from an antique sewing machine (the top was added by the seller). I did some Google searching and found this:

The "The Free" on the bottom pedal was the name of the sewing machine, which was manufactured by the Free Sewing Machine Company based out of Rockford, Ill. I'm certain that the bottom of my table is from this model specifically. It looks exactly the same as the picture, and you can even see holes on the upper sides of the legs where the drawers would have attached. I couldn't find a date for when they manufactured the machines of this style, but it's still pretty cool!
Friday, February 4, 2011
Tuesday, February 1, 2011
New Art


I snagged these two prints off Etsy for $15 each. The frames were 40% off at Michael's, and the matting was a couple bucks a pop. I love them!
Wednesday, January 5, 2011

Friday, December 3, 2010
We Need A Little Christmas
Last December, Daniel and I took a trip to Colonial Williamsburg. The place was all decked out for Christmas, and it was really fun to walk around and see all the decorations, which were handmade out of all natural materials--tree branches, fruit, flowers, etc. Here are some examples:


While we were there, we attended a wreath-making workshop at the historical museum. This year, we decided to try to put our untested wreath-making skills to use.
Daniel gathered the necessities:
- a couple of fake wreaths, needed for their wire frames
- several bunches of different tree cuttings from the local garden center
- florist wire
- florist tape
- a bag of cinnamon pieces and pinecones
- assorted fruit
I supplied some pliers/wirecutters, and we were off.
The first step was removing the fake wreaths from their wire frames. Then, we attached individual branches to the wire frames using the florist wire, and then added on the final decorative touches at the end. The process is easier to see using pictures:
 Scout inspects the back of the fake wreath. The wire frame seen here provided the frame for our wreaths.
 Some of the clippings. We used red cedar and fir for the wreaths' bodies.
 My wreath in the beginning. It looks best if you start at one point on the wreath and go around all the way in the same direction. This hides the ends of your branches.
 Using florist wire to attach a branch to the metal frame.
 My wreath once I got all the red cedar branches on!
 Then I attached some of these small decorative branches with the yellow tips.
 I also added on a few fir branches.
 And finally, some pinecones and cinnamon stick bits, all attached with the wire.
 The final product!!!
 Here it is hanging up outside!
 Daniel's wreath - he used fir for the body and then added on apples, oranges, and some little red faux cranberry-ish balls, as well as little pinecones on the piece hanging down. Again, everything attached with wire. He used the green florist tape to wrap the ends of the branches so they would be better disguised. Looks great!
We were actually quite skeptical of the whole process before starting out. At one point early on, Daniel whispered to me, "I have no idea what I'm doing." Well, I didn't either. I think the real key is getting enough of a base built up so it looks beefy and hides the frame and the individual ends of all the branches. This can be time-consuming, though, since you're basically building the wreath one branch at a time. I think the entire process probably took us about 4-5 hours, spread over two nights. We are quite pleased with ourselves! It's going to be a new yearly Christmas tradition. Stay tuned to see what we do with all the leftovers.


While we were there, we attended a wreath-making workshop at the historical museum. This year, we decided to try to put our untested wreath-making skills to use.
Daniel gathered the necessities:
- a couple of fake wreaths, needed for their wire frames
- several bunches of different tree cuttings from the local garden center
- florist wire
- florist tape
- a bag of cinnamon pieces and pinecones
- assorted fruit
I supplied some pliers/wirecutters, and we were off.
The first step was removing the fake wreaths from their wire frames. Then, we attached individual branches to the wire frames using the florist wire, and then added on the final decorative touches at the end. The process is easier to see using pictures:


We were actually quite skeptical of the whole process before starting out. At one point early on, Daniel whispered to me, "I have no idea what I'm doing." Well, I didn't either. I think the real key is getting enough of a base built up so it looks beefy and hides the frame and the individual ends of all the branches. This can be time-consuming, though, since you're basically building the wreath one branch at a time. I think the entire process probably took us about 4-5 hours, spread over two nights. We are quite pleased with ourselves! It's going to be a new yearly Christmas tradition. Stay tuned to see what we do with all the leftovers.
Subscribe to:
Posts (Atom)